I highly suggest you first read my Distortion 101 post that explains the differences between lens & perspective distortion.
I have a two step workflow for distortion that is quick and streamlined. I use PT Lens for lens distortion and then DxO Viewpoint II for perspective changes. Both are available as stand alone applications or as filters within Photoshop where I use them. I can usually remove all lens distortion and straighten all verticals in an interior shot in about 1 minute.
PT Lens is a brilliant software program that corrects lens distortion, vignetting, and chromatic aberration. I've exchanged emails with the creator, Tom Niemann, who is an excellent guy and made a simple solution to a rather complex problem.
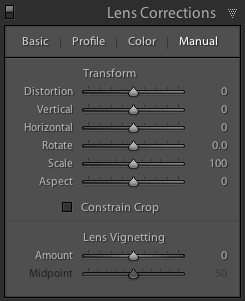
Traditionally, lens distortion can be corrected manually in Lightroom, Photoshop, or almost any RAW image processing software. You'll quickly find that many wide angle lenses have complex distortion issues that are extremely difficult if not impossible to correct with only a barrel/pincushion slider (Lightroom 5 version seen below). Mustache distortion for example is actually a combination of barrel & pincushion distortion and as you correct one of them you make the other worse.
Lightroom 5.6 Lens Correction Panel
This is when you need a custom correction module that is specific to your camera with the exact lens creating the problem. Tom Niemann tests every camera + lens combo and programs the unique corrections needed to remove lens distortion in its entirety. This is a completely automated process and requires no thinking or fidgeting on your end while at the same time giving perfectly consistent results every time. PT Lens will literally read your EXIF information (or can be selected manually) and all you have to do is press "OK". You'll instantly see everything snap into place and deformed/curved lines will again be straight.
I always say that PT Lens is like a chiropractor visit for your wide-angle. As long as you've got good resolution to start with PT Lens will straighten everything up!
Workflow
Below you will see 4 images: The Original RAW image, after Lightroom & Photoshop edits, after PT Lens, and after DxO Viewpoint 2. Click to enlarge and compare. Notice wall on the left of the image once again become straight once run through PT Lens.
To start, process your RAW image and make any global changes in Lightroom (or other RAW editor). Once I have done everything I can in Lightroom I'll bring a photo into photoshop (Lightroom ➡ Photoshop: cmd/ctrl + e) for any advanced retouching and of course distortion correction.
If you have no other edits to perform, go ahead and duplicate your layer (cmd/ctrl + J) and with that new layer selected go to Filters > ePaperPress > PT Lens. If you already have several layers of edits you'll need to do a Stamp Visible Layer (cmd/ctrl + option/alt + shift + E) to merge all visible layers into a new one that is ready for PT Lens. We want to always perform our adjustments on separate layers as to remain non-destructive while having the option to toggle visibility on/off for a before & after view. Ensure your camera + lens information is correct inside PT Lens and press "OK".
After lens distortion is fixed in PT Lens I immediately use DxO ViewPoint II for perspective distortion correction. Although PT Lens can do minor perspective changes, DxO ViewPoint is a significantly more robust program for converging verticals and other perspective irregularities.
Once finished, save your image back to Lightroom as a PSD or TIFF with layers intact. This way you have saved not only your distortion corrections but also your general edits which can always be tweaked later.
Conclusion
Although lens distortion can be corrected manually, you will receive better results in a quicker workflow using PT Lens. I am in no way associated with or sponsored by PT Lens, but Tom Niemann's software offers incredible value at just $25 for a lifetime license which includes constant updates for new lenses. I've said it before and I'll say it again, PT lens is one of the best investments I've ever made in my photography.


